In Part 1, we set up our environment and tested it out with a little HTML code. More importantly, we built a basic coding workflow.
Having and practicing a good workflow is important—not just for the sake of productivity, but because every project is different. A new employer might mean having to learn a new CMS, for instance, or even a new programming language. That’s why it’s important not to learn specific tools, but to have simple procedures that you know well and can fall back on.
Your new coding environment might not be as fancy as something like Codeacademy, but it will work anywhere, from your blog to the Huffington Post. To recap, the steps in our HTML workflow are:
- Write your prose and code in a text editor.
- Save the file with the extension
.html - Double-click the HTML file to view it in your web browser.
- Make changes and corrections to your code, re-save the file, and reload the page.
Now that we’re comfortable with this process, it’s time to learn more HTML.
Nesting
As we saw in Part 1, HTML is a language of tags. There are a few dozen tags in HTML5 (down from well over a hundred in HTML4). We’ll learn what many of them are for, but first let’s take a look at what they all have in common.
HTML tags interact in predictable ways. One features of tags is that they can nest, stacking together like Russian dolls. Nested tags inherit the properties of their surrounding tags. For instance, this line of code:
<strong><em>It was the best of times, it was the blurst of times.</em></strong>
…produces the following output:
It was the best of times, it was the blurst of times.
The <strong> tag encapsulates the <em> tag, which encloses the text on the inside. Both tags apply their respective formatting inward, causing the contents to be rendered in both bold and italic.
Tag nesting does not have to be symmetrical:
<strong>It was the best of times, <em>it was was the blurst of times.</em></strong>
It was the best of times, it was was the blurst of times.
In this case, the <strong> tag applies to the entire line, but the <em> tag only affects the second half.
Notice that in both examples, the tags are closed in reverse order from how they were opened. This pattern is called Last In, First Out (LIFO). Following this practice in your own code is crucial. The innermost opening tag should always get the innermost closing tag. The outermost opening tag should always get the outermost closing tag.
This line:
<strong><em>Please don't do this.</strong></em>
…is bad HTML. So is this:
<em><strong>Also don't do</em> this. Please.</strong>
If you ignore my advice and type these lines of code into your text editor (try it!) they will still work as expected. HTML is designed to be resilient, and browsers are forgiving of simple mistakes.1 But why learn bad habits? Learn to nest correctly. LIFO.2
Parents, children, and siblings
Tags can be on the outside of other tags (“parents”), inside other tags (“children”), or at the same level as other tags in the tag hierarchy (“siblings”). This line of code contains parent, child and sibling tags:
<em><strong>All TV</strong> and no beer make Homer <strong>go crazy.</strong></em>
All TV and no beer make Homer go crazy.
In this example, <em> is a parent tag with two children (the two <strong> tags). The <strong> tags are siblings to each other. Child tags inherit properties from parent tags, but tags don’t have any effect on their siblings. Child tags can also be parents to their own child tags—passing down their own traits along with those of the original parents (“grandparents”).
As you can imagine, nesting more than a few tags together can make your code difficult to read—and almost impossible to bugfix. When your code involves multiple levels of tags, consider formatting it in indented style. The above example could be written out like this:
<em>
    <strong>All TV</strong> and no beer make Homer
    <strong>go crazy.</strong>
</em>
On each new line, hit the tab key to indent child tags and line up sibling tags. Your text editor will keep track of what level you’re on when you press enter. To go “up” a level, press backspace at the beginning of a line. You can also select one or more lines of code and press shift + tab to unindent them by a single level. Because it’s a good habit to get into, I’ll be using indented style for most examples from now on.
There is no limit to how deep the tag hierarchy can go—grandchildren, great-grandchildren, etc.—or how many sibling tags can exist at a particular level. As a matter of fact, most webpages are built with long and intricate tag trees.
But no matter how many tall the tree gets or how many branches it sprouts, the same principle applies everywhere: child tags inherit all the inheritable properties of their parents (and grandparents, and great-grandparents…). For this reason, writing good HTML is as much about structuring your tags as it is about choosing them.
Whitespace and the Paragraph Tag: <p>
Whitespace in HTML is insignifcant. Extra spaces, tabs and line breaks are treated by web browsers as if they weren’t there at all:
<strong>This</strong>       is
        weirdly-formatted

and ugly<em> but
</em>
  technically correct
              code.
This is weirdly-formatted and ugly but technically correct code.
Because HTML ignores whitespace, you have the freedom to format your code however you like (such as in the indented style demonstrated above). But this little “feature” creates problems for writers who need the ability to write in paragraphs:
This is <strong>one</strong> paragraph.

This is supposed to be <strong>another</strong> paragraph.
This is one paragraph. This is supposed to be another paragraph.
Unless you instruct the browser otherwise, your beautifully-crafted paragraphs will all be smushed together onto one line. Thankfully, there’s a tag for that. Using the HTML paragraph tag <p>, we can get the expected behaviour:
<p>
    This is <strong>one</strong> paragraph.
</p>

<p>
    This is supposed to be <strong>another</strong> paragraph.
</p>
This is one paragraph.
This is supposed to be another paragraph.
Like most tags, the <p> tag has an opening tag and a closing tag: </p> It’s good practice to wrap every paragraph in <p> tags. Not only will they get the proper amount of line-spacing, but also the correct fonts, colours, and formatting that your site has set up for body copy.3
Manually inserting <p> tags between paragraphs is one of the most tedious parts of writing prose in HTML. For that reason, coders and writers have come up with several ways to make the task easier:
- WordPress will automatically convert blank lines into paragraph breaks. If you know your code will be going into WordPress, simply ignore the
<p>tag and press enter twice between paragraphs. Then copy your code into the WordPress text editor and submit your post. Other CMSes may also have an option to work this way. - Markdown treats blank lines as paragraph breaks, just like WordPress. Many CMSes support Markdown either natively or with plugins.
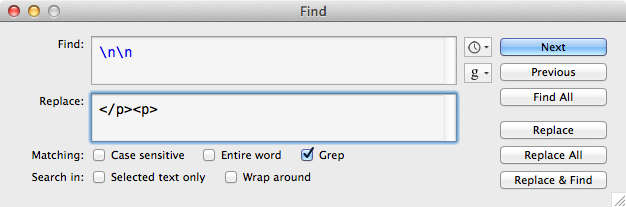
- Use the Find feature in your text editor to search for line breaks and replace them with
<p>tags. Write your article with blank lines between paragraphs, and then use a regular expression to replace\n\n(two consecutive line breaks) with</p><p>.
<p> tag before your first paragraph and a single closing tag after your last.Alternatively, just get used to writing <p> a whole lot. It’s not so bad. Better than manually fixing the multi-column layout in your coworker’s Word document which for some inexcusable reason was set in Comic Sans MS.
In Part 3, we’ll see the dozen or so HTML tags every writer should know.
-
Just as browsers will forgive out-of-order nesting, they will also try to make sense of your code if you accidentally leave out closing tags. Depending on various factors, an unclosed tag will apply to the rest of the section or the rest of the entire page. This is probably not what you intended to happen. So nest properly, and close your tags. ↩
-
The pattern opposite, found in certain programming languages, is FIFO: First In First Out. ↩
-
The line break tag <br> creates one or more manual line breaks between blocks of text. Using multiple <br> tags is a little like hitting ‘enter’ a bunch of times in Word. But <br> does not come with any of the formatting benefits of the <p> tag. It can cause ugly layout inconsistencies. Use it only as a last resort. ↩